Getting Started with JS SDK
This tutorial starts with the installation of alya js sdk, and describes the steps involved in the connection to the Alaya network, basic query, transfer and signing, and interaction with smart contracts. This tutorial aims to show how to use Alaya Js Sdk in an informative and accurate way, so that developers can quickly get started with Alaya JS SDK.
Install Alaya js sdk in nodejs#
- It is recommended to install the LTS version of nodejs.
- Install
lerna. Before installation, you can uselerna --versionto verify whether it has been installed before. If not, usenpm i lerna -gfor global installation. - Initialize the
nodejsproject. Create a new project folder and enter this folder, such asmkdir alaya-js-sdk-examples & cd alaya-js-sdk-examples. Then use the commandnpm init -yto initialize the project. This operation will create a new filepackage.jsonunderalaya-js-sdk-examples. - Install Alaya's js sdk. Still in the previous folder, use the command
npm i AlayaNetwork/client-sdk-js#0.15.1-developto install js sdk. - Create the
basic.jsfile for the subsequent development. This tutorial will introduce the code for basic RPC query in this file.
In this part, we add two lines of code to basic.js:
var Web3a = require('web3');console.log(Web3a.version);Note: In this tutorial, in order to distinguish them from the Web3 and web3 of Ethereum in most tutorials, Web3 in the original document is renamed to Web3a, and web3 is renamed to web3a.
- Run
basic.js. Use the commandnode basic.jsin the command line to run this code. If it returns a version number similar to the following, it means that you have installed Alaya js sdk.
0.15.1Note: The following code can all be run on nodejs and web pages unless otherwise specified.
Connect to the Alaya Blockchain and Perform Basic Queries#
Alaya's network is divided into the mainnet, development network and private network. In order to reduce development costs, it is recommended to use the development network or the private network for development and testing. After testing, the project can be deployed on the mainnet. For more information about the network, please refer to: Join Alaya Network·Alaya. For related information about the development network, please refer to: [Join Alaya Network·Alaya](/alaya-devdocs /en/Join_the_dev_network)
In order to lower the threshold for readers, this tutorial uses the development network as an example.
Connect to the Development Network#
var Web3a = require('web3');var web3a = new Web3('http://47.241.91.2:6789');console.log(web3a.currentProvider)Of course, we can also use web3.setProvider and web3.platon.setProvider to set the network.
Query Basic Network Information#
There will be many examples of asynchronous calls in subsequent development. There are three most common in js syntax:
- callback, please refer to JavaScript Asynchronous Programming and Callback (nodejs.cn)
- Promises, please refer to Understanding JavaScript Promise (nodejs.cn)
- async/await, please refer to Modern Asynchronous JavaScript with Async and Await (nodejs.cn)
In order to simplify the code, this tutorial uses async/await. The following code is the entire content of basic.js, and the comments inside explain the usage of each snippet of code.
async function main() { var Web3a = require('web3'); var web3a = new Web3a('http://47.241.91.2:6789'); // The protocol version of the node. The returned result is a hexadecimal string var version = await web3a.platon.getProtocolVersion(); console.log("The protocol version of the node:" + web3a.utils.hexToNumber(version)); // true/false Whether the Alaya node is synchronizing, true/false var syncing = await web3a.platon.isSyncing(); console.log("Whether the Alaya node is synchronizing" + syncing); // The current gas price, which is determined by the median gas price of several recent blocks. The unit is VON var gasPrice = await web3a.platon.getGasPrice(); console.log("Gas Price: " + gasPrice); // It returns the current block number var blockNumber = await web3a.platon.getBlockNumber(); console.log("Block Number: " + blockNumber); // It returns the balance of a specific account address in the specified block, in the unit of VON var address = "atp1td535z2n3c7rjmsxuxdafd9gu8waz5lfx2a3c9"; var balance = await web3a.platon.getBalance(address); console.log("Address Balance: " + balance); // It returns the block corresponding to the specified block number or block hash var blockHash = "0x577e9777f0ee1cf1b4d2d45a959ee57a59ebd0927740df4cd483c99eb5c58e83"; blockNumber = 10418171; var blockByHash = await web3a.platon.getBlock(blockHash); console.log("Get Block by Hash: " + JSON.stringify(blockByHash)); var blockByNumber = await web3a.platon.getBlock(blockNumber); console.log("Get Block by Number: " + JSON.stringify(blockByNumber)); // It returns the number of transactions in the specified block, and, like in the previous function, the parameters can be blockHash or blockNumber var transCount = await web3a.platon.getBlockTransactionCount(blockHash); console.log("Transaction Number in Block: " + transCount); // It returns the transaction object with the specified hash value var transHash = "0xa4414b82479af4dbdf4bab822f46f2414c200152553758678e506195b0fa9cfb"; var trans = await web3a.platon.getTransaction(transHash); console.log("Transaction: " + JSON.stringify(trans)); // The number of transactions issued by the specified address. This function is very useful and can be used to determine the nonce of the transaction var accountTransCount = await web3a.platon.getTransactionCount(address); console.log("Account Transaction Count: " + accountTransCount);}main();The above code only exemplifies some of the commonly used query functions. You can find that the use of query functions is very simple, which seems clear in the above example.
Transfer#
Connecting to the Alaya network and obtaining relevant information are the first step, but in fact, account-related operations are important to development. After all, you cannot participate in Alaya without an account. Below we start from creating an account to explain how to use the account and how to acquire related information.
Account#
Before we start, let’s briefly introduce what is an account:
Alaya uses an account system similar to that of Ethereum. For details, please refer to: [Alaya Overall Plan · Alaya](/alaya-devdocs/en/Architecture#account model)
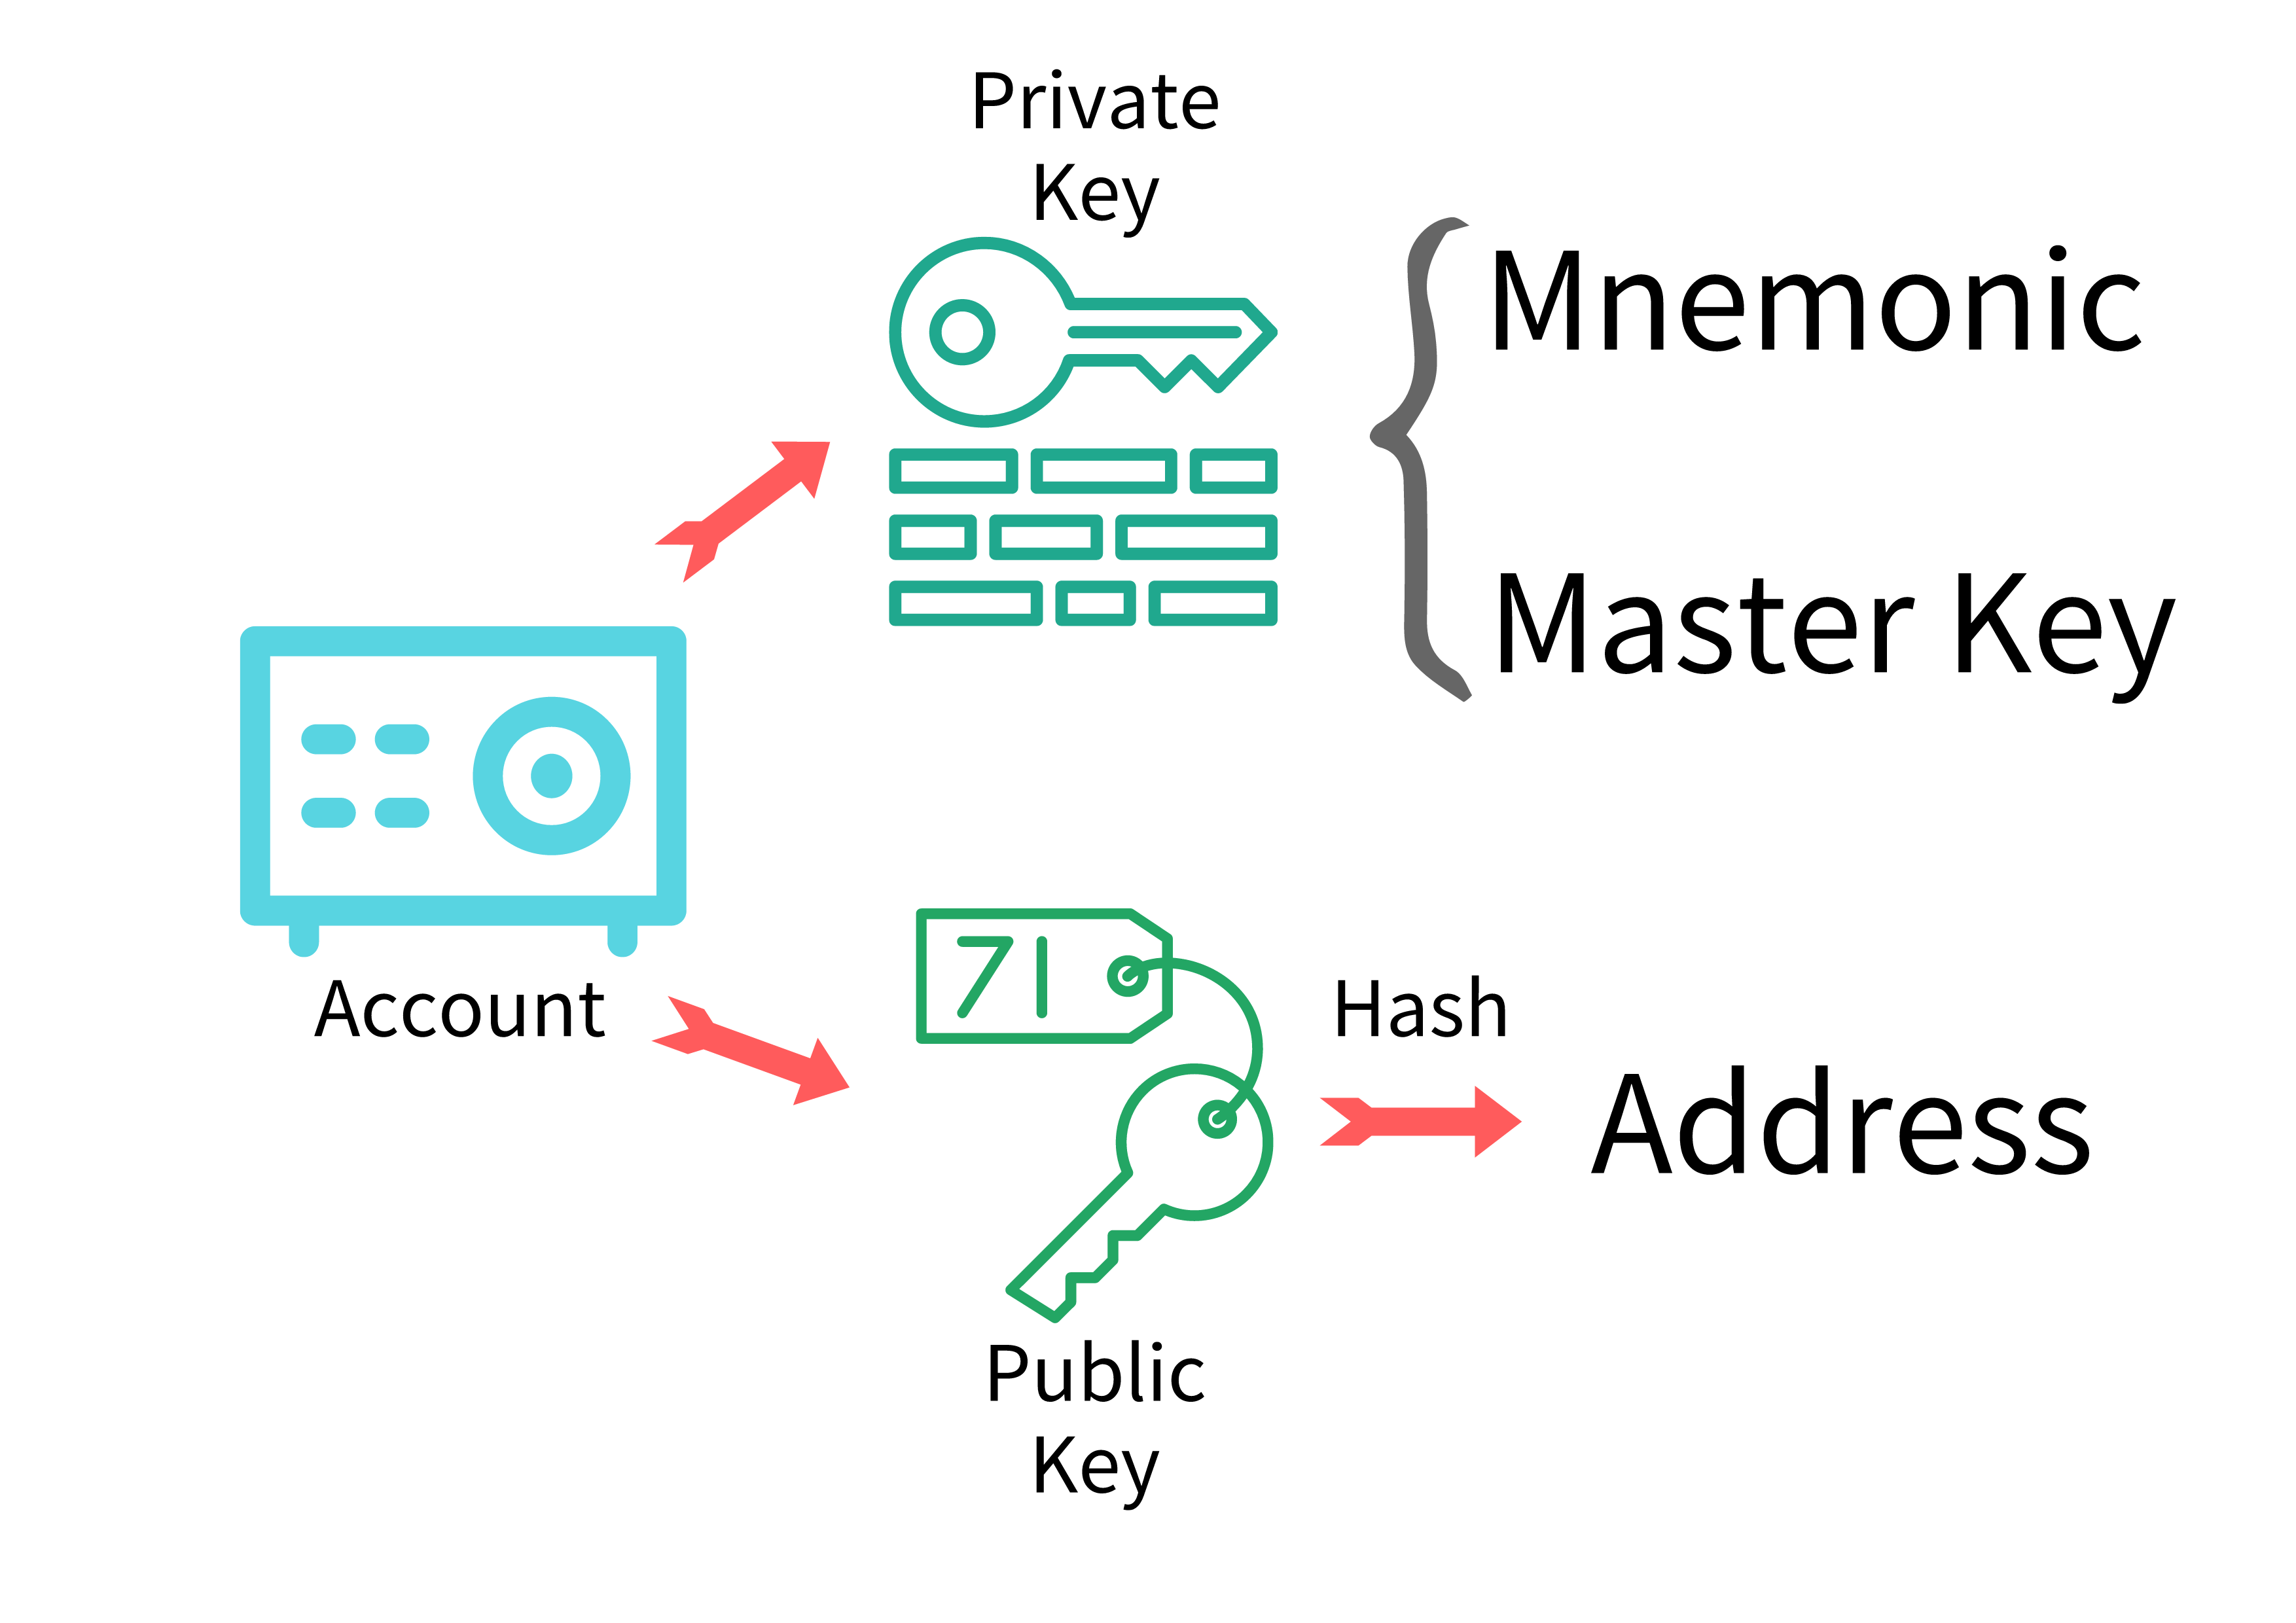
Account: It's like a safe which stores the state of each account.
Private key: The private key can completely control the account, so it should be stored properly. There are two forms of private keys: the mnemonic and master key. The mnemonic contains 12 words, and its main function is to help you remember the key. Please note that if your mnemonic phrase is leaked, your key has been leaked. The master key is a 64-bit hexadecimal number. This key is generally used in programs, which is difficult to use or remember manually.
Public key: It can be regarded as your account address or bank card number. The public key generates an address after a hash operation. Others can use the address (or public key) to transfer money to you, and of course you can also check your operation history.
Transfer#
Whether it is a transfer or other operation, the general process is as follows:
Transfer and signing described in the next section are the most commonly used operations for accounts. But in fact, transfer also involves data signing, but it will not be detailed in this section.
Note: !!!! It is very dangerous to write the private key of the mainnet in the code and share it with others!!!!
Let's take a look at the specific code of the transfer:
var Web3a = require("web3");var AlayaAccounts = require("web3/packages/web3-eth-accounts");async function main() {
    let web3a = new Web3a('http://47.241.91.2:6789');
// !!!!It is very dangerous to write the private key of the mainnet in the code and share it with others!!!! // address for the privatekey below: atp1sznvsju6gjy3kmgnfgm526jf6e8x83twuctefh var privateKey="0x5ae02064df442340f861136acbfc4bd62b3d48393903bd6aac77ce0e7aaa9e5e"; var chainId = 201030; //201018 for mainnet // // privatekey for the address below: 0x0727b77a246f2c01c1b7b068c26bd71b81700f7ea003dd1ba68a38885a69a1a5 var toAddress = "atp1jqtmpjme9gvg6wnuyphzqzgphslfmjtxcy8mt2"; var act = new AlayaAccounts(web3a.currentProvider, "atp"); act = act.privateKeyToAccount(privateKey); let from = act.address; let nonce = web3a.utils.numberToHex(await web3a.platon.getTransactionCount(from)); let gasPrice = await web3a.platon.getGasPrice(); let tx = { from: from, to: toAddress, value: "1000000000000000000", chainId: chainId, gasPrice: gasPrice, gas: "21000", nonce: nonce, }; // Sign the transaction let signTx = await act.signTransaction(tx); // Send the transaction let receipt = await web3a.platon.sendSignedTransaction(signTx.rawTransaction); console.log("The receipt of the transaction is: " + JSON.stringify(receipt)); console.log("sign tx data:\n", signTx.rawTransaction)}main();Please pay attention to the process of generating the account act. Since the hrp of the Alaya network is atp, the setting process involves two steps:
Specifying hrp;
Setting PrivateKey.
Corresponding to lines 14 and 15 in the above code respectively.
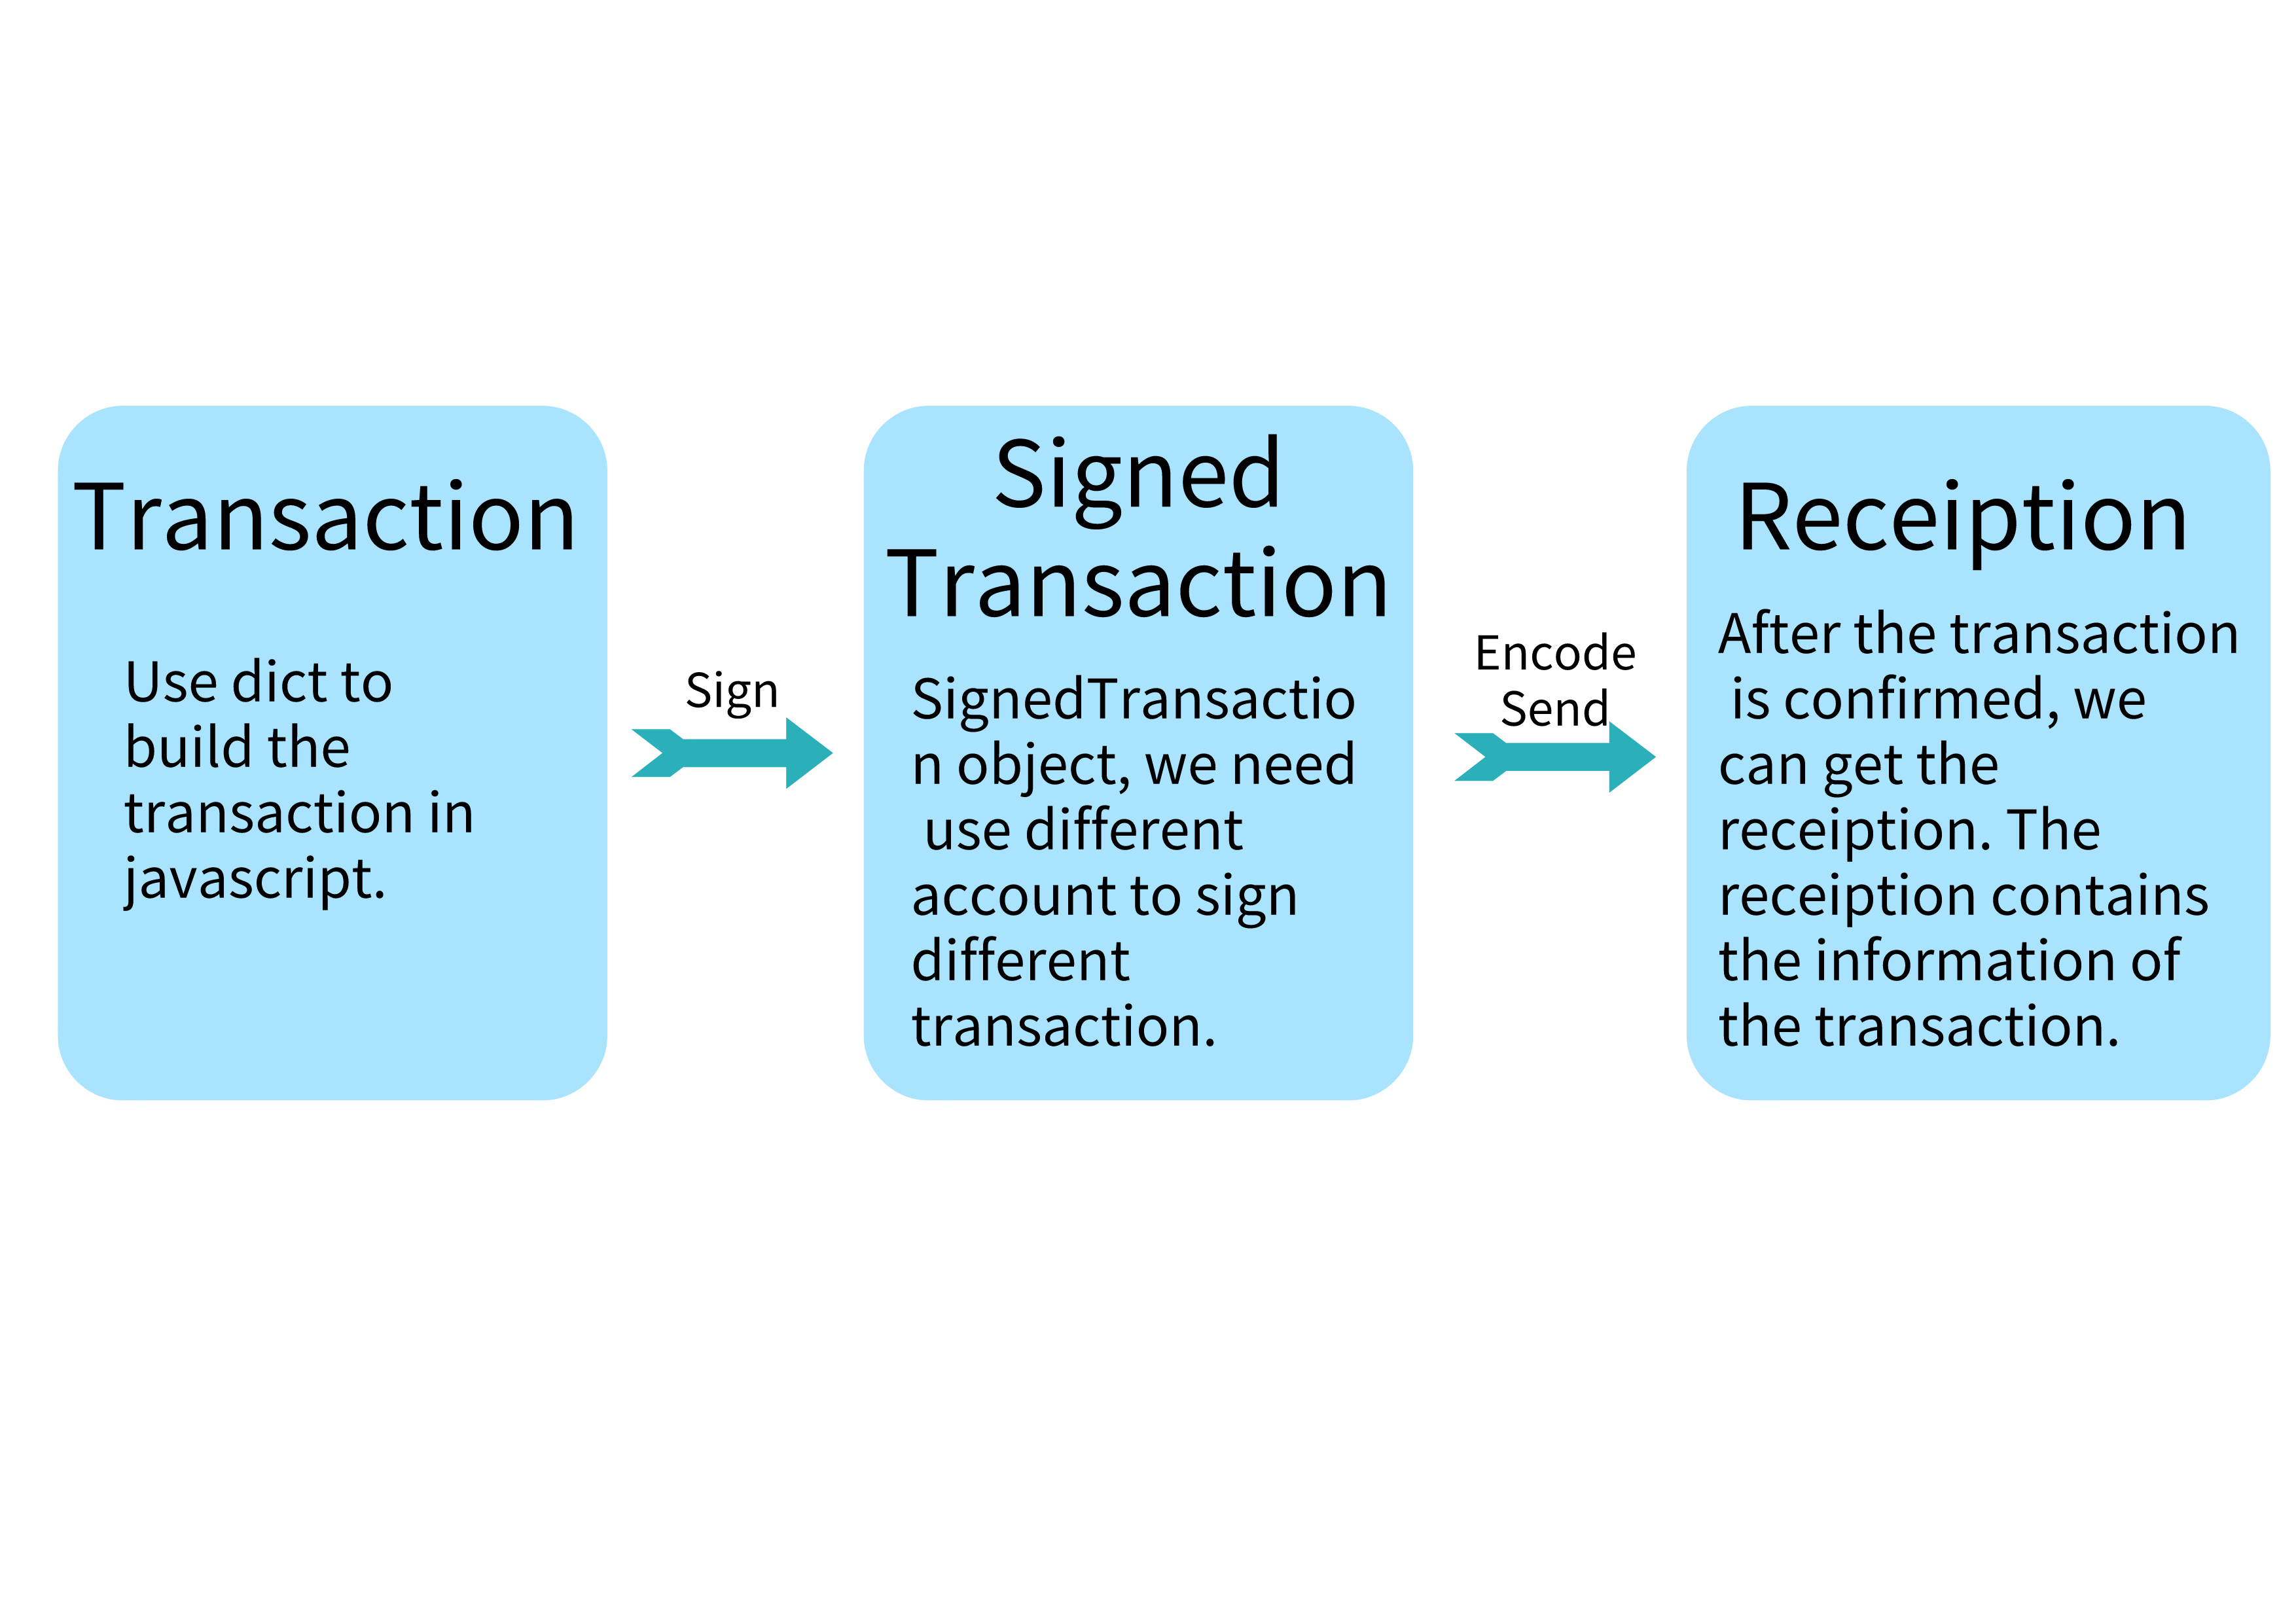
It is important to know how to create and fill in transaction information. In JavaScript, the dictionary type can be directly used in a transaction, and there are many fields that need to be queried from the Alaya network. For example, for nonce and gasPrice, the recommended value can be found from the network, or you can set it yourself.
The following signature is also an asynchronous operation, but all of its signature operations are executed locally, which is an offline signature.
The transaction will be sent after being signed. After the transaction is sent successfully, the transaction receipt containing a lot of transaction information will be returned. For details, please refer to: JS SDK · Alaya
Sign#
As mentioned in the previous documents, signing is one of the most commonly used operations in the Alaya application. All transactions must be signed before being packaged on the blockchain. The essence of signature is to show your identity to the blockchain, and you are willing to guarantee the correctness and pay gas for the transaction you signed. Therefore, Web3 has also designed a variety of signature methods. Below are details of the two most commonly used signing methods.
Signature of an Unlocked Account#
As you may find in the document, web3a.platon.signTransaction means:
To sign the transaction, the account must be unlocked first.
But how?
Here is an explanation of what is an unlocked account and how to generate it. An unlocked account generally occurs in the following two situations:
Use some convenience tools of the testnet, such as Ganache in Ethereum (seemingly no similar tools in Alaya yet). Test accounts will be generated along with private test nodes, and these accounts are unlocked accounts, which can be signed with
web3a.platon.signTransaction.Some wallets, such as some hardware wallets, PlatON's Samurai wallet, Ethereum's MetaMask, etc., can also generate unlocked wallets.
In fact, the second situation is more common in actual development, but we will skip this part the content of this part because it will be included in the tutorial of Samurai wallet.
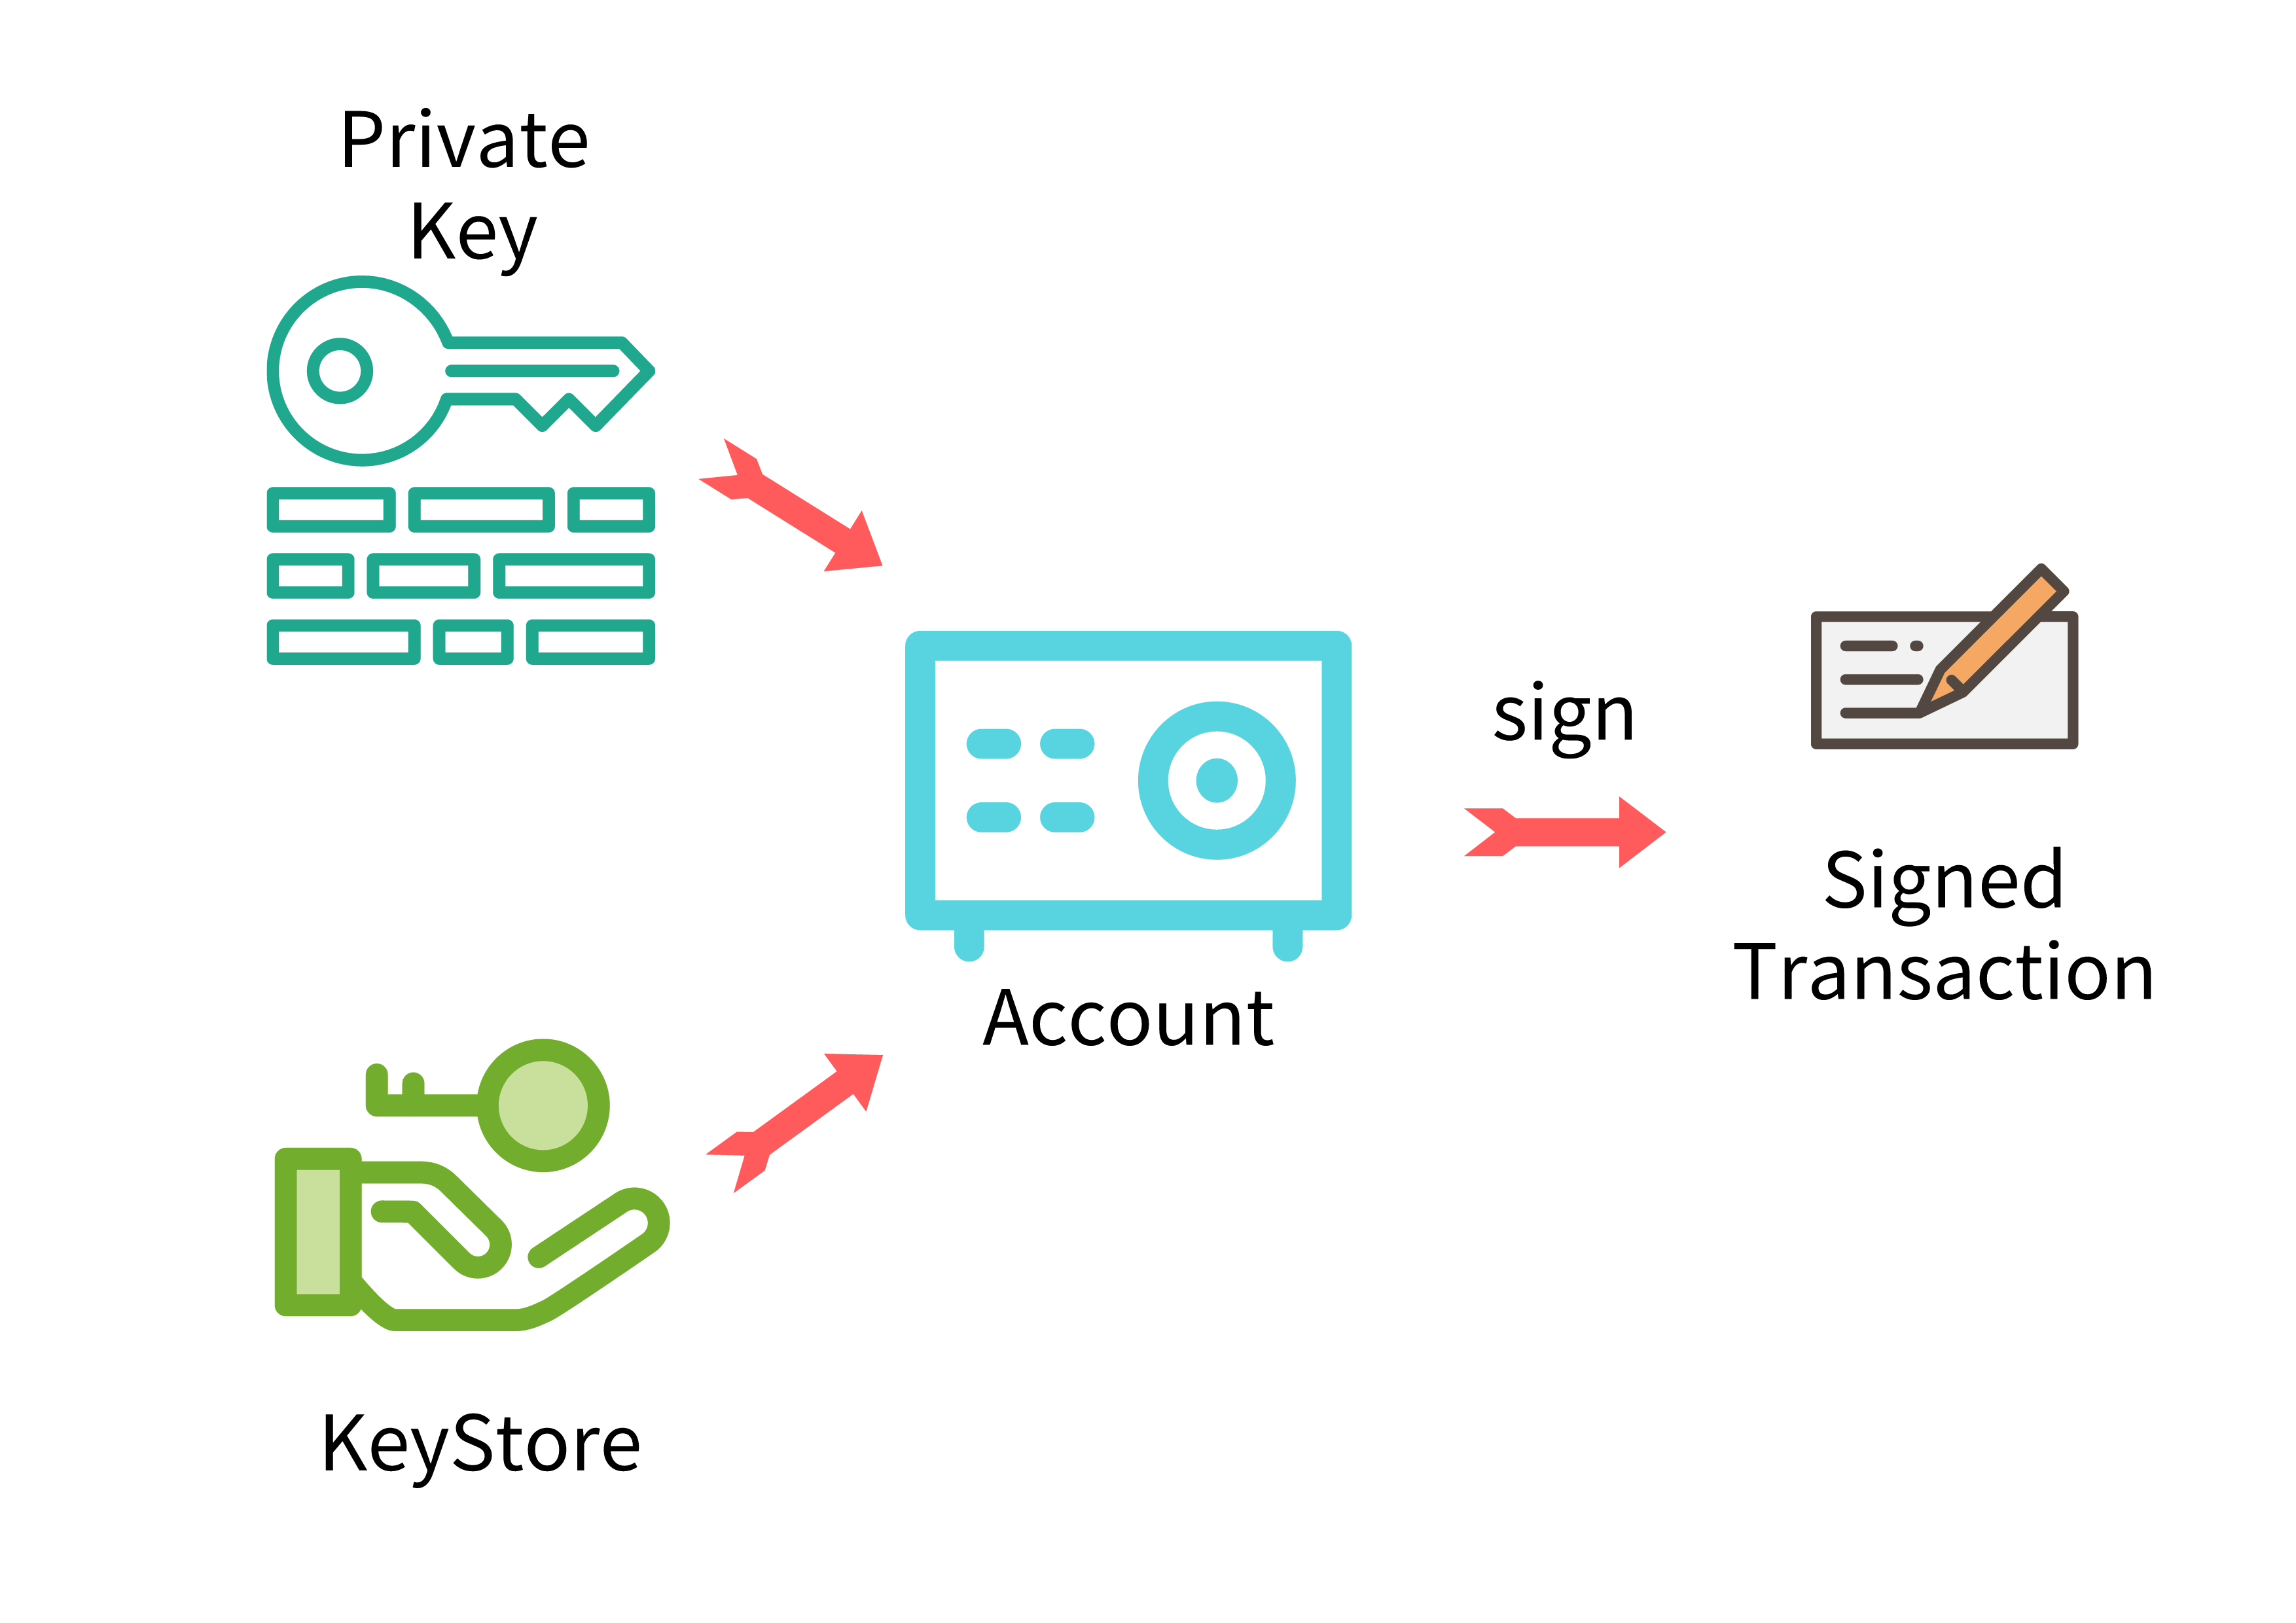
Use PrivateKey or KeyStore to Sign#
In the above code, we used PrivateKey for signing, that is, web3a.platon.accounts.signTransaction. This method directly receives the transaction and privateKey parameters and returns a signedTransaction. It is actually a convenience tool that quickly generates a signed transaction. In order to make the code logic clearer, we recommend using a private key (PrivateKey) or KeyStore to generate an account (Account) for signing, as shown below:
This snippet of code is exactly the same in function as the above one, except that some changes have been made to the transaction signature:
var Web3a = require("web3");var AlayaAccounts = require("web3/packages/web3-eth-accounts");async function main() {
    let web3a = new Web3a('http://47.241.91.2:6789');
// !!!!It is very dangerous to write the private key of the mainnet in the code and share it with others!!!! // address for the privatekey below: atp1sznvsju6gjy3kmgnfgm526jf6e8x83twuctefh var privateKey="0x5ae02064df442340f861136acbfc4bd62b3d48393903bd6aac77ce0e7aaa9e5e"; var chainId = 201030; //201018 for mainnet // // privatekey for the address below: 0x0727b77a246f2c01c1b7b068c26bd71b81700f7ea003dd1ba68a38885a69a1a5 var toAddress = "atp1jqtmpjme9gvg6wnuyphzqzgphslfmjtxcy8mt2"; var act = new AlayaAccounts(web3a.currentProvider, "atp"); let from = act.address; let nonce = web3a.utils.numberToHex(await web3a.platon.getTransactionCount(from)); let gasPrice = await web3a.platon.getGasPrice(); let tx = { from: from, to: toAddress, value: "1000000000000000000", chainId: chainId, gasPrice: gasPrice, gas: "21000", nonce: nonce, }; // Conversion between PrivateKey and Account act = act.privateKeyToAccount(privateKey); // keystore Conversion between keystroe and privateKey. Of course you can also read the keystore from the file let keystore = web3a.platon.accounts.encrypt(privateKey, "platon12345678"); // Restore Account by keystore act = act.decrypt(keystore, "platon12345678"); // Sign a transaction let signTx = await act.signTransaction(tx); // Send a transaction let receipt = await web3a.platon.sendSignedTransaction(signTx.rawTransaction); console.log("The receipt of the transaction is: " + JSON.stringify(receipt)); console.log("sign tx data:\n", signTx.rawTransaction)}main();This code is logically easier to understand: first we use PrivateKey to generate an account, and then use this account to sign the transaction. Of course, the above code actually generates act twice, which aims to demonstrate the conversion between PrivateKey and Keystore and how to use PrivateKey and Keystore to generate accounts.
Smart Contract#
Having known how to sign, we can further learn how to use smart contracts.
Note: This document does not discuss how to write smart contracts, but only how to use js sdk to perform smart contract-related operations.
This tutorial takes solidity contract as an example.
Before using alya sdk to interact with smart contracts, let us make one point clear, that is, what can alya sdk do?
- Can alaya sdk compile smart contracts? No, at this stage, Alaya’s smart contract can be compiled by using alaya-truffle and PlatONStudio. For details, please refer to: [EVM Smart Contract · Alaya](/alaya-devdocs/zh-CN/Solidity_Getting_started#Compile helloworld contract)
- Can Alaya sdk deploy smart contracts? Yes! Later, we will talk about how to deploy smart contracts with alya sdk.
- Can alaya sdk interact with smart contracts? Sure! This is one of the main functions of alya sdk.
Deploy Smart Contract#
Before it is deployed, a smart contract needs to be compiled. For the specific compilation method, please refer to [EVM Smart Contract · Alaya](/alaya-devdocs/zh-CN/Solidity_Getting_started#compile the helloworld contract). After being tested and compiled using https://remix.ethereum.org/, it can also run normally on the alya network. After compiling, you will get abi and bytecode, which will be used in the code subsequent. Due to the limitation of space, we will not introduce the compilation process in more detail. In this tutorial, we use [EVM smart contract·Alaya](/alaya-devdocs/zh-CN/Solidity_Getting_started#Create helloworld contract) to create the HelloWorld contract. The two variables after compilation are as follows:
let bytecode = "0x608060405234801561001057600080fd5b5061036b806100206000396000f3fe608060405234801561001057600080fd5b50600436106100365760003560e01c806317d7de7c1461003b578063c47f0027146100b8575b600080fd5b61004361015e565b6040805160208082528351818301528351919283929083019185019080838360005b8381101561007d578181015183820152602001610065565b50505050905090810190601f1680156100aa5780820380516001836020036101000a031916815260200191505b509250505060405180910390f35b610043600480360360208110156100ce57600080fd5b8101906020810181356401000000008111156100e957600080fd5b8201836020820111156100fb57600080fd5b8035906020019184600183028401116401000000008311171561011d57600080fd5b91908080601f0160208091040260200160405190810160405280939291908181526020018383808284376000920191909152509295506101f5945050505050565b60008054604080516020601f60026000196101006001881615020190951694909404938401819004810282018101909252828152606093909290918301828280156101ea5780601f106101bf576101008083540402835291602001916101ea565b820191906000526020600020905b8154815290600101906020018083116101cd57829003601f168201915b505050505090505b90565b805160609061020b90600090602085019061029e565b506000805460408051602060026001851615610100026000190190941693909304601f810184900484028201840190925281815292918301828280156102925780601f1061026757610100808354040283529160200191610292565b820191906000526020600020905b81548152906001019060200180831161027557829003601f168201915b50505050509050919050565b828054600181600116156101000203166002900490600052602060002090601f016020900481019282601f106102df57805160ff191683800117855561030c565b8280016001018555821561030c579182015b8281111561030c5782518255916020019190600101906102f1565b5061031892915061031c565b5090565b6101f291905b80821115610318576000815560010161032256fea265627a7a72315820087868e5d428c0270af7145556516942e16a5db5ec467f7dcdca4cfa9ec099bc64736f6c63430005110032";let abi = [{ "constant": false, "inputs": [ { "internalType": "string", "name": "_name", "type": "string" } ], "name": "setName", "outputs": [ { "internalType": "string", "name": "", "type": "string" } ], "payable": false, "stateMutability": "nonpayable", "type": "function" }, { "constant": true, "inputs": [], "name": "getName", "outputs": [ { "internalType": "string", "name": "", "type": "string" } ], "payable": false, "stateMutability": "view", "type": "function" } ];In order to reduce the code length, these two variables may be used directly in the subsequent code without being assigned separately.
The smart contract deployment is actually very simple and similar to the transfer previously mentioned, and it also follows the order of generating a transaction->signing a transaction->sending a transaction. Let's take a look at the code below!
var Web3a = require("web3");var AlayaAccounts = require("web3/packages/web3-eth-accounts");async function main() {    let web3a = new Web3a('http://47.241.91.2:6789');    let bytecode = "";
// !!!!It is very dangerous to write the private key of the mainnet in the code and share it with others!!!! // address for the privatekey below: atp1sznvsju6gjy3kmgnfgm526jf6e8x83twuctefh var privateKey="0x5ae02064df442340f861136acbfc4bd62b3d48393903bd6aac77ce0e7aaa9e5e"; var chainId = 201030; //201018 for mainnet var act = new AlayaAccounts(web3a.currentProvider, "atp"); act = act.privateKeyToAccount(privateKey); let from = act.address; let nonce = web3a.utils.numberToHex(await web3a.platon.getTransactionCount(from)); let gasPrice = await web3a.platon.getGasPrice(); let tx = { from: from, chainId: chainId, gasPrice: gasPrice, nonce: nonce, data: bytecode }; // Evaluate the transaction fees required for this transaction let gas = await web3a.platon.estimateGas(tx); tx.gas = gas; // Sign a transaction let signTx = await act.signTransaction(tx); // Send a transaction let receipt = await web3a.platon.sendSignedTransaction(signTx.rawTransaction); console.log("The receipt of the transaction is: " + JSON.stringify(receipt)); }main();Note: The above code cannot be run directly. The bytecode variable is used in the code but it is not assigned. You need to assign the bytecode variable before using it.
Doesn't it seem familiar? The two biggest differences between it and the previous transfer transactions are:
- It has no to and value
- It has data that stores bytecode
Interact with Smart Contract#
We often need to interact with smart contracts, but unfortunately, few tutorials on the Internet have made it clear, especially interaction with smart contracts when using public nodes. So many of us may have a question: can I interact with smart contracts without a privatKey?
It depends, because we usually interact with smart contracts in two ways: one is call, and the other is send.
call#
Sometimes, we only need to query some data from the blockchain without changing the state of the blockchain. At this time, we can use call to interact with the blockchain. Since we haven't changed the blockchain, we don't need to pay gas or sign with a private key, which is quite convenient.
var Web3a = require("web3");async function main() { let web3a = new Web3a('http://47.241.91.2:6789'); // The address of the smart contract that I have deployed let contractAddress = "atp1pcvx85klajfw9mvy3tf07acmqxaek5nanuy5t6"; console.log("contract address: " + contractAddress); let abi = []; // Construct a contract object let contract = new web3a.platon.Contract(abi, contractAddress); let name = await contract.methods.getName().call(); console.log("name before change: " + name); }main();Note: The above code cannot be run directly. The bytecode variable is used in the code but it is not assigned. You need to assign the bytecode variable before using it.
As you can see, the form of call is very simple. You can query information directly from the blockchain even without a private key. If you use my contract address, you will find from the blockchain that the name is rileyge. If you use your newly deployed contract, the name is empty.
send#
Note that send is just a title. In fact, as you will see later, we do not use the send function in the following code. When should we use send to interact with the blockchain? Simply put, when the operation needs to change the state of the blockchain, we need the send method to interact with the blockchain. At this time, we need to sign the transaction and pay the gas.
If you have read similar tutorials elsewhere, you will find that they are using unlocked accounts. As mentioned earlier, unlocked accounts are only used when it comes to private nodes or related wallets, while the nodejs program does not use wallets (in some cases it does, of course). So how to use unlocked accounts to interact with smart contracts via send?
Still the previous routine: Generating a transaction->Signing a transaction->Sending a transaction. The key lies in how to generate a transaction.
var Web3a = require("web3");var AlayaAccounts = require("web3/packages/web3-eth-accounts");async function main() {    let web3a = new Web3a('http://47.241.91.2:6789');
// !!!!It is very dangerous to write the private key of the mainnet in the code and share it with others!!!! // address for the privatekey below: atp1sznvsju6gjy3kmgnfgm526jf6e8x83twuctefh var privateKey="0x5ae02064df442340f861136acbfc4bd62b3d48393903bd6aac77ce0e7aaa9e5e"; var chainId = 201030; //201018 for mainnet var act = new AlayaAccounts(web3a.currentProvider, "atp"); act = act.privateKeyToAccount(privateKey); let from = act.address; let gasPrice = await web3a.platon.getGasPrice(); // The smart contract deployed let contractAddress = "atp1pcvx85klajfw9mvy3tf07acmqxaek5nanuy5t6"; let abi = []; let contract = new web3a.platon.Contract(abi, contractAddress); let name = await contract.methods.getName().call(); console.log("name before change: " + name); let trans = contract.methods.setName("rileyge"); let options ={ to : trans._parent._address, // You can also use contractAddress data : trans.encodeABI(), // You can also refer to abi gas : await trans.estimateGas({from: from}), gasPrice: gasPrice, chainId : chainId } signTx = await act.signTransaction(options); // Send a transaction receipt = await web3a.platon.sendSignedTransaction(signTx.rawTransaction); name = await contract.methods.getName().call(); console.log("name after change: " + name);}main();Note: The above code cannot be run directly. The bytecode variable is used in the code but it is not assigned. You need to assign the bytecode variable before using it.
If you use a deployed smart contract, you need to modify the variables in the setName function to see how it goes. There are something worth noting in the above code, all in the options variable.
- The trans variable is the transaction about the setName method constructed by the Contract class. The specific uses of this transaction are explained in the following points.
- to is set as the address of the smart contract, which is very easy to understand.
- In data, function names and variables are abi-encoded, which is a complicated process. For the specific encoding method, refer to Function ABI encoding rules (github.com) . Fortunately, aaya sdk has handled this, so you just need to call the encodeABI() function.
- The last issue involves a bug of alaya sdk. I have already explained in details in [Alaya Sdk cChainId and Prefix Conflict · Issue #61 · PlatONnetwork/client-sdk-js (github.com)](https://github.com/ The problem is explained in detail in AlayaNetwork/client-sdk-js/issues/2) and provided a temporary solution.
Summary of Transaction Construction:
- The commonly used variables in transaction construction are: from, to, value, gas, gasPrice, data, chainId, etc. In fact, some variables have default values in many cases, such as gas and gasPrice. So don't be surprised if you find some variables unset in transactions.
- Among these variables, chainId seems quite interesting. This variable must be set correctly because it aims to avoid replay attacks on different chains.
- The construction of data is the key to constructing transactions. In some complex transactions, data is encoded into data in some way.
Isn't the interaction between alaya sdk and smart contract easy? Now explore by yourself!
Summary#
That is all for this tutorial. There are also two major parts about alya js sdk: usage in an explorer and interaction with a built-in contract. However, given the potential version update which may make a big difference to the above two operations, I will introduce these two parts after the upgrade.